 Sunlite Systems Pvt. Ltd.





Epson Projector Setup Services for Offices, Schools and Institutions
Why a Projector Needs a Setup Service, Not Just a Delivery
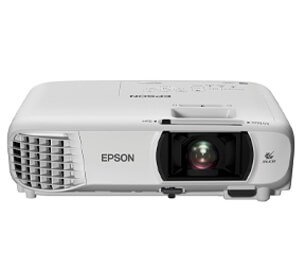
Epson has built a strong presence in business and education projection because its business and education projector lines are dependable, offer good brightness and colour accuracy, and are relatively straightforward to maintain over years of daily classroom or boardroom use. None of that reliability, however, shows up automatically the moment a projector is taken out of its box. Correct mounting height, throw distance calculation, lens alignment, and connection to whatever source devices a room actually uses all determine whether an Epson projector performs the way its specification sheet promises. This is the practical reason organisations increasingly search for Epson projector setup services rather than treating installation as something any staff member with a ladder can handle.
A projector mounted at the wrong height, or positioned without regard to throw ratio, produces a distorted or poorly sized image regardless of how capable the unit is. A projector connected without considering a room's actual mix of laptops, desktops and video-conferencing hardware becomes a source of daily frustration rather than a productivity tool. Proper setup is what turns a good projector into a good projection experience.
What Epson Projector Setup Actually Involves
A complete setup service begins with confirming the room's use case — a classroom used for daily lessons has different brightness and mounting needs than a boardroom used primarily for video conferencing, and an auditorium used for large seminars has different throw and screen-size requirements again. From this, the integrator selects the correct mounting position, calculating throw distance against the intended screen size so the projected image fills the screen cleanly without excessive keystone correction, which itself degrades image quality if relied on too heavily.
Physical installation includes mounting the projector securely, whether ceiling-mounted or on a stand, running power and signal cabling in a way that keeps the room tidy and safe, and connecting the unit to the room's source devices — laptops, desktops, a dedicated PC, or a video-conferencing system. In rooms where multiple source devices need to share a single projector, this often means installing a signal switcher so users can toggle between a laptop, a permanently installed PC, and a conferencing camera without repeatedly changing cables, a task typically handled well through Kramer's switching hardware in more complex rooms.
Setup also includes projector configuration itself: adjusting brightness and colour settings appropriate to the room's ambient lighting, setting up any network connectivity the projector supports for remote monitoring or control, and configuring auto-shutdown and lamp-life monitoring so the institution can plan maintenance proactively rather than reactively. For rooms with a Draper screen already installed or being installed alongside the projector, alignment between the two is handled as a single coordinated task rather than two separate, disconnected jobs.
Ceiling Mounts Versus Portable Setups
Permanent installations — classrooms, boardrooms, and auditoriums — generally call for a ceiling mount, which requires structural assessment of the ceiling and careful cable concealment. Portable or semi-permanent setups, such as a training room used occasionally, may instead use a stand or table mount, which is quicker to install but still benefits from correct throw-distance calculation and colour calibration to get the best result from the same hardware.
Site Preparation and Planning Before Setup Day
Planning for a projector installation starts with an honest assessment of the room's lighting conditions, since ambient light is one of the biggest factors affecting perceived image quality — a projector that looks excellent in a darkened demo room can look washed out in a sunlit classroom unless brightness and screen choice are matched to that reality. Where possible, planning should also address blackout curtains or blinds if the room's natural light is expected to interfere with daytime use.
Power and network availability at the intended mounting position should be confirmed ahead of installation day, along with the exact throw distance and screen size, ideally coordinated with any screen installation happening in parallel. In older buildings, particularly government offices and long-established schools, ceiling structure and existing wiring sometimes need reinforcement or rerouting before a ceiling mount can be safely installed, and identifying this during planning avoids delays on the day itself.
Institutions running multiple identical rooms — a school with several classrooms, or a corporate office with several meeting rooms — benefit from planning a standard setup template once, then replicating it consistently across rooms, which simplifies both installation and future maintenance.
How to Choose the Right Setup Provider
Selecting a provider for Epson projector setup deserves the same scrutiny as any other institutional purchase decision, since installation quality directly affects years of daily use.
- Authorised experience with Epson's business and education projector ranges, including familiarity with lamp versus laser models and their differing maintenance needs.
- Ability to calculate throw distance and mounting position accurately rather than estimating by eye.
- Comfort integrating multiple source devices through a signal switcher when a room requires it, rather than leaving users to manually swap cables.
- Willingness to calibrate brightness and colour settings for the room's actual lighting conditions, not just factory defaults.
- A support structure for lamp replacement and ongoing maintenance, since projectors are consumable-dependent equipment unlike most other IT hardware.
An authorised, GeM-registered integrator such as Sunlite Systems Pvt Ltd combines Epson product knowledge with the broader AV integration experience needed when a projector setup is only one part of a larger room fit-out involving screens, audio and control systems.
What to Expect During Installation: Step by Step
Clients commissioning a professional setup can expect a fairly consistent sequence of steps regardless of room type.
- Confirmation of room use case, screen size, and mounting position based on a pre-installation survey or floor plan.
- Physical mounting of the projector, whether ceiling-mounted or stand-based, with cabling routed neatly and safely.
- Power and signal connection, including any signal switcher needed for multiple source devices.
- Lens alignment and keystone adjustment, positioning the image squarely within the screen area.
- Brightness and colour calibration matched to the room's actual lighting conditions.
- Testing with the room's real source devices — laptops, desktop PCs, or conferencing systems — rather than only a test pattern.
- Configuration of network features, auto-shutdown, and lamp-life monitoring where supported.
- Client walkthrough of day-to-day operation, including how to switch sources and adjust basic settings, followed by handover documentation.
Common Installation Mistakes to Avoid
Several avoidable mistakes recur across projector installations, often traced back to skipping proper planning.
- Mounting the projector without calculating throw distance correctly, resulting in an image too large or small for the screen.
- Relying heavily on digital keystone correction instead of correct physical positioning, which softens image sharpness.
- Ignoring room lighting conditions during brightness selection, leading to a washed-out picture during daytime use.
- Leaving cabling exposed and untidy rather than concealed, both a safety and an aesthetic issue.
- Failing to plan for multiple source devices, leaving users to unplug and replug cables constantly.
- No plan for lamp replacement or maintenance, resulting in unexpected downtime when a lamp eventually fails.
Sector Scenario: A School Rolling Out Smart Classrooms
Consider a school upgrading a block of classrooms from chalk-and-board teaching to projector-assisted digital lessons. Each classroom needs a ceiling-mounted Epson education projector positioned to project onto a screen visible from every seat, connected to a teacher's desktop or laptop, and calibrated to remain legible under the classroom's daytime lighting, which is rarely as controlled as a corporate boardroom.
Planning for this kind of rollout benefits enormously from a standard setup template — the same mounting height, throw distance, and cable routing repeated across every classroom — which speeds up installation and ensures every room performs consistently rather than each being a slightly different, one-off configuration. Because school terms leave limited windows for disruptive installation work, projects like this are typically scheduled during vacation periods, with all classrooms completed in a single coordinated phase rather than staggered across the term, so that teaching resumes without any classroom left mid-upgrade.
The GeM and Institutional Procurement Angle
Educational institutions and government offices procuring Epson projectors through GeM tenders typically require installation and commissioning as part of the delivered scope, along with documentation confirming the equipment was installed and tested to specification. This makes the setup provider's competence just as contractually significant as the projector brand itself.
A GeM-registered vendor capable of handling procurement, installation, calibration and handover documentation under a single engagement removes the friction of coordinating between a hardware supplier and a separate installation contractor, and it ensures the institution has a single point of accountability if issues arise during the warranty period. For multi-room rollouts such as school classroom upgrades, this single-point accountability also simplifies audit and tender-closure documentation considerably.

Frequently Asked Questions
How do I know what screen size my Epson projector needs?
Screen size should be calculated from the projector's throw ratio and the intended mounting distance from the screen, ideally done together with screen selection rather than after the projector is already mounted.
Can one projector support multiple input devices in a boardroom?
Yes, through a signal switcher installed alongside the projector, allowing users to toggle between a laptop, a permanently installed PC, or a conferencing system without manually swapping cables.
How often does an Epson projector lamp need replacement?
This varies by model and daily usage hours; a professional setup service typically configures lamp-life monitoring so replacement can be planned proactively rather than discovered as a sudden failure.
Is calibration really necessary, or does the projector work fine out of the box?
Out-of-the-box settings rarely match a specific room's lighting and screen conditions well; proper calibration noticeably improves image clarity and colour accuracy for the room's actual use.
Does setup include training for staff who will operate the projector daily?
A thorough setup service includes a basic walkthrough for whoever will operate the projector regularly, covering source switching, power cycling, and basic troubleshooting.
Closing Summary
A projector's real-world performance is decided as much by its setup as by its specification sheet — mounting position, throw calculation, calibration for actual room lighting, and integration with the room's other source devices all determine whether an Epson projector delivers the classroom or boardroom experience it is capable of. Organisations searching for Epson projector setup services should prioritise providers who plan the room holistically rather than treating installation as a quick, generic task. Readers planning a paired screen installation should review our guide on Draper screen AV integration in Delhi, and those installing servers or workstations alongside a projector rollout may find our piece on Dell server installation near me useful as a companion project. Browse projector and AV hardware at the Sunlite Systems Online Store, learn about our broader service footprint at Sunlite Systems India, review our company background at Sunlite Systems Pvt Ltd, and for unrelated gifting needs visit our Rudraksh India store.
Throw Distance, Ambient Light, and Placement
A projector that looks correctly mounted can still disappoint if placement calculations were skipped. Anyone researching Epson projector setup services should know throw distance must match the specific lens and zoom range, keystone/lens shift should fine-tune (not compensate for) placement, and ambient light needs assessment at different times of day, not just during a single site visit.
Post-Installation Support and AMC for Multi-Room Deployments
Projectors are consumable-driven — lamps degrade, filters need cleaning, firmware affects compatibility with newer devices. An effective AMC includes scheduled filter cleaning and lamp-life monitoring so replacements happen proactively, plus tracking usage hours across a fleet to forecast replacement budgets.
How often should an installed Epson projector's filter and lamp be checked?
Depends on usage and environment; filters should be inspected at each maintenance visit and lamp hours tracked against rated life.
Can an existing screen and mount be reused when upgrading to a new Epson projector model?
Often yes, but the new throw ratio must be checked against the mount's distance and weight rating first.
Explore More — Sunlite Systems Network
Ready to Install Epson Equipment?
Sunlite Systems Pvt Ltd is a GeM-registered, authorized Epson installation partner across India.
Contact Us Now